Publish Your Application
Let our step-by-step tutorial walk you through every stage — from setup to publication.
Our guide will help you publish your app on Google Play, App Store, or even directly on your website.
Creating and publishing your app with AppMyWeb is easy, fast, and requires no coding skills.
Where Can I Publish My Application?
With AppMyWeb, you can create applications for Android, iOS, and progressive web platforms.
You can distribute your app in any of the following ways:
-
Google Play Store
-
Apple App Store
-
Or host it directly on your own website via a download link — if you don’t plan to publish it in a store.
How to Publish an App on Google Play
To publish an Android app, you’ll need a Google Play Developer Account.
This account allows you to upload and manage your Android applications.
-
Registration cost: $25 USD (one-time payment, lifetime access)
-
Register here: Google Play Console Signup
Once your developer account is ready, follow these steps:
-
Open Play Console.
-
Select “All Apps” → “New App.”
-
Choose your default language and specify the app name as it should appear on Google Play.
-
Complete the App Details, Content Rating Survey, and Pricing & Distribution sections.
-
Upload your .AAB or .APK file built in AppMyWeb.
For more details, visit the official Google Play documentation.
How to Create or Upload Android Signing Keys
Before publishing your Android app, you’ll need a signing key.
AppMyWeb makes this process simple and automatic — no technical setup required.
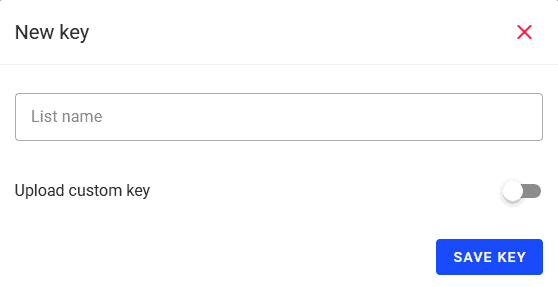
Step 1 – Create a New Android Key
-
Go to Key Manager → Create Key → Create Android Key in your AppMyWeb dashboard.
-
You’ll see a screen like this:
-
Enter a name for your key (for example, My Android Key).
-
Click Save Key.
The system will automatically generate secure signing keys for your app.
These keys are linked to your account and used automatically in all your Android builds.
Step 2 – Upload an Existing Key (Optional)
If you already have a signing key from an existing app on Google Play:
-
Toggle “Upload custom key” to ON.
-
Upload your existing keystore file, enter your alias, and provide the key and store passwords.
-
Click Save Key to complete the setup.
💡 Tip: For most users, the automatic option is faster and safer.
Only use the manual upload if your app already exists on Google Play and must use the same key.
How to Publish an App on the App Store (Automatic Publish)
Publishing your iOS app with AppMyWeb is fully automated — no Mac, no Xcode, no manual uploads needed.
Apple Developer Account Requirements
To publish iOS apps, you’ll need an Apple Developer Account.
-
Registration cost: $99 USD per year
-
Register here: Apple Developer Program Enrollment
Once your Apple Developer account is active, follow the steps below.
Step 1 – Create a New App in Apple Developer
-
Log in to your Apple Developer Account.
-
Go to Certificates, Identifiers & Profiles → Identifiers → App IDs.
-
Click + to create a new App ID.
-
Use the same app name and Bundle ID as in your AppMyWeb project.
✅ Example:
-
AppMyWeb → App ID: com.yourbrand.myapp
-
Apple Developer → Bundle ID: com.yourbrand.myapp
⚠️ The Bundle ID must match exactly, or the automatic publishing process will fail.
Step 2 – Create and Download Your Apple Key (.p8 file)
-
In your Apple Developer account, go to Certificates, Identifiers & Profiles → Keys.
-
Click + to create a new key.
-
Give it any name (e.g., AppMyWeb Key).
-
Enable Apple Push Notifications (APNs) — optional, but required if your app uses push notifications.
-
Click Continue → Register, then download the .p8 key file.
-
Copy your Key ID and Team ID from the account dashboard.
Step 3 – Add Your Key in AppMyWeb
-
In your AppMyWeb dashboard, go to Key Manager → Create Key → Create iOS.
-
Upload the .p8 file, enter your Team ID and Key ID, and click Save.
💡 This securely connects your Apple Developer account to AppMyWeb for automated publishing.
Step 4 – Build and Publish Automatically
-
Open your app in the AppMyWeb dashboard.
-
Click New Build → Select iOS (.ipa).
-
Choose the signing key you created.
-
Enable the switch “Publish in AppStore Connect?”
-
Click Start Building.
Once the build is complete, your app will automatically be uploaded to App Store Connect for review.
💡 Need help?
If you experience any issue during setup or build, you can always contact our support team directly through the AppMyWeb dashboard.
🧾 Quick Tip
If you prefer to download your .IPA file instead of automatically publishing it to App Store Connect, make sure the “Publish in AppStore Connect” switch is turned off before starting the build.
This will create the build locally in AppMyWeb and allow you to download the .IPA file directly from your dashboard once the build is complete.
You can then upload the file manually to your Apple Developer account or share it with your team for testing.
⚠️ Important: The “Publish in AppStore Connect” switch must remain off when you only want to generate and download the IPA file.
🎨 How to Get App Download Icons (Badges)
To display official app download badges on your website, use the resources below:
-
Google Play Badge Generator – Google Play Badges
-
App Store Marketing Guide – Apple Marketing Guidelines
-
Windows Store Icons – Microsoft Store Marketing
✅ Summary
With AppMyWeb, you can build, sign, and publish apps for both Android and iOS automatically — without any technical setup.
-
Android keys can be generated automatically with one click.
-
iOS apps can be built and sent directly to App Store Connect automatically.
-
Both platforms support manual uploads if you already have your own keys or accounts.
Bring your app ideas to life — faster and easier than ever — all from your AppMyWeb dashboard.